Quick start guide
In this guide, you will learn how to get up and running on the J.P. Morgan Payments Developer Portal and make your first request with one or more of our Payments APIs. By the end of this Quick start guide, you will know how to:
- Create an account
- Create a project
- Add APIs to a project
- Retrieve an access token
- Send a payment request
Before you begin
To complete this tutorial, you will need a basic understanding of:
- REST APIs
- cURL
Create an account
Creating an account provides an uplifted experience where you can create projects, collaborate with team members, generate access tokens, and try-out Payments APIs in the Mock environment.
- Create a new account by registering your email address or connecting a linked social account.
- Check your email for a message from noreply@jpmorgan.com containing a one-time password (OTP) to verify your identity.
- Enter the OTP into the input field labeled One Time Password, then click Next.
- When redirected to the account sign-in page, enter your username and password or select an alternative method to sign in to the Payments Developer Portal.
Create a new project
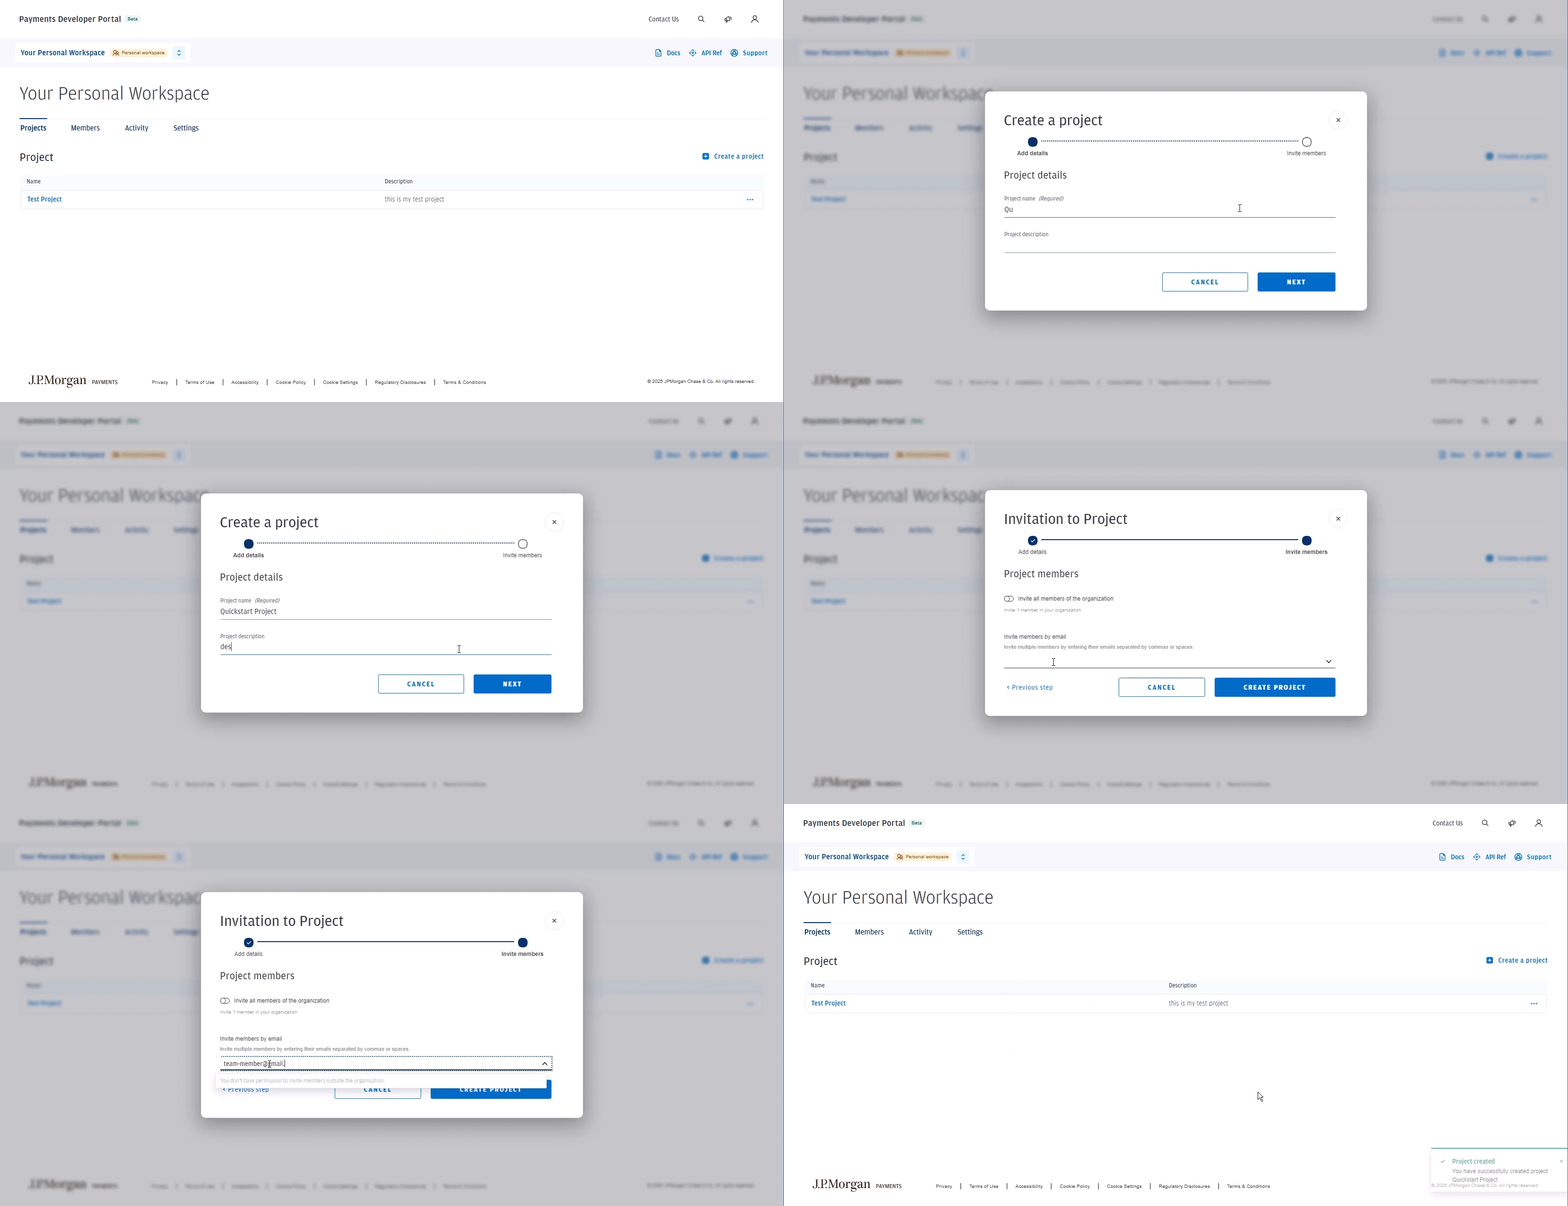
Projects are the primary containers for development within the J.P. Morgan Payments Developer Portal, and contain a set of enabled APIs, users, and access tokens.

To create a project:
- Select Create a project in Your Personal Workspace.
- Enter a project name and description.
- Click Next.
- You are given the option to invite other members of your organization to become project members. If you choose to do so, invite them by email.
- Select Create Project.
Add an API to your project
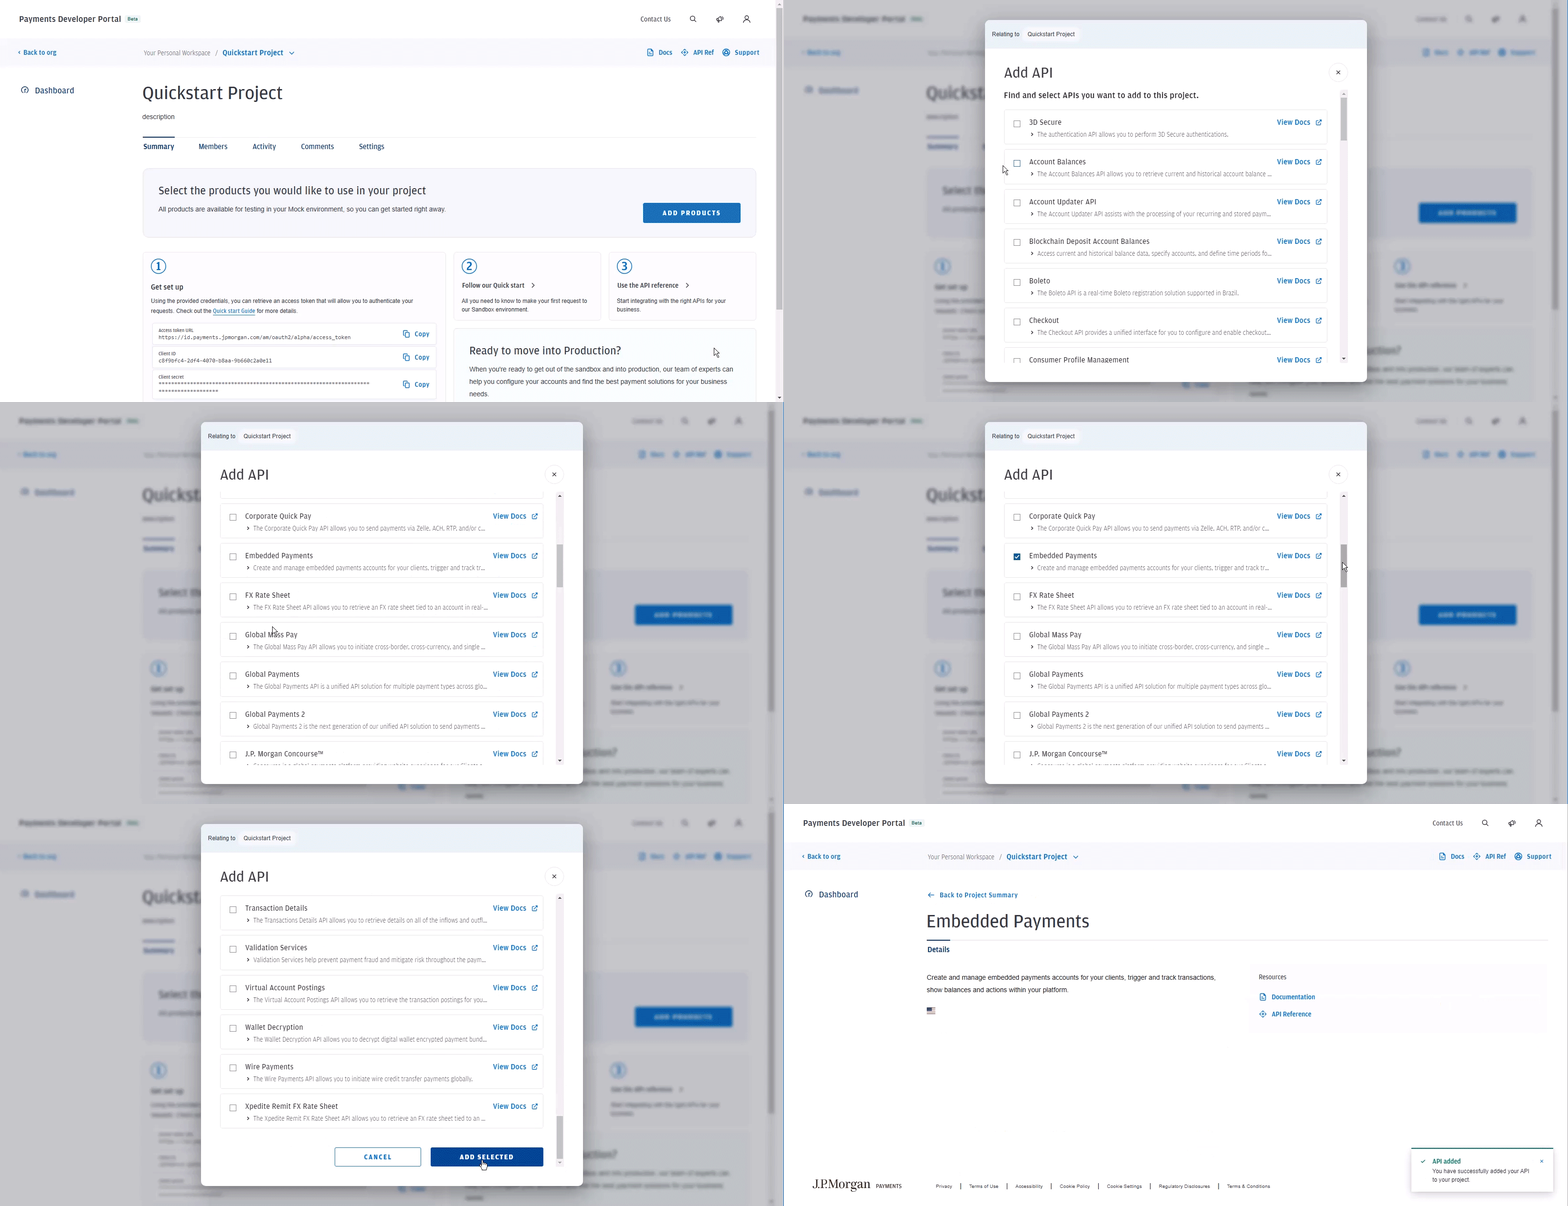
To access an API, you must first add it to your project. We will use the Online Payments API for this tutorial.

To add the Online Payments API to your project:
- Select your project.
- Within your project, select ADD PRODUCTS.
- Check the box labeled Online Payments API.
- Select ADD SELECTED.
Retrieve your access token
The mock environment for your newly added API must be accessed through authenticated requests. To do this, you must retrieve an access token and include it in any requests you make to the API.
Request your access token
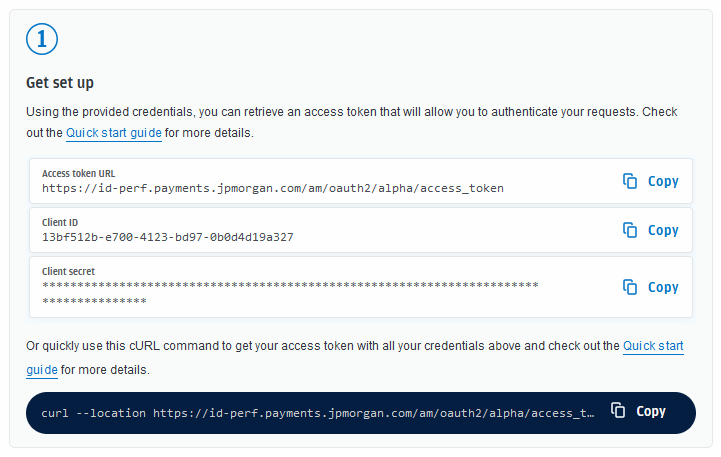
Navigate to the Get set up section within your project dashboard.

Retrieve your access token by making the following POST request. Replace the following placeholder values in the cURL command with the actual values from your dashboard:
<client_id>: Your Client ID<Secret>: Your Client Secret- The URL (https://id.payments.jpmorgan.com/am/oauth2/alpha/access_token) should match the Access Token URL provided for your environment.
curl --location 'https://id.payments.jpmorgan.com/am/oauth2/alpha/access_token' \
--header 'Content-Type: application/x-www-form-urlencoded' \
--data-urlencode 'grant_type=client_credentials' \
--data-urlencode 'scope=jpm:payments:sandbox' \
--data-urlencode 'client_id=<client_id>' \
--data-urlencode 'client_secret=<Secret>'
Confirm response
A successful response returns an access_token value, which you must include in all requests to the J.P. Morgan Payments APIs:
{
  "access_token": "eyJ0eXAiOiJKV1QiLCJraWQiOiJJR05rNSthbHVNdy9FeHQ4ejc5Wmg5ZVpZL0U9IiwiYWxnIjoiUlMyNTYifQ.eyJzdWIiOiJiODUzNTE3Zi05ODRhLTQ3MDEtOWU2OS0zOGU1OWJjMzg4YjQiLCJjdHMiOiJPQVVUSDJfU1RBVEVMRVNTX0dSQU5UIiwiYXVkaXRUcmFja2luZ0lkIjoiZmY1OTQwYWItZDhkNC00NGE2LTk2MjMtZTk3MjdhODAyMDVmLTE0NDc1NCIsInN1Ym5hbWUiOiJiODUzNTE3Zi05ODRhLTQ3MDEtOWU2OS0zOGU1OWJjMzg4YjQiLCJpc3MiOiJodHRwczovL2lkLnBheW1lbnRzLmpwbW9yZ2FuLmNvbTo0NDMvYW0vb2F1dGgyIiwidG9rZW5OYW1lIjoiYWNjZXNzX3Rva2VuIiwidG9rZW5fdHlwZSI6IkJlYXJlciIsImF1dGhHcmFudElkIjoiY1VVbUVIWEJRUG5DY2JmX1lQY1lGUVktUk9VIiwiYXVkIjoiYjg1MzUxN2YtOTg0YS00NzAxLTllNjktMzhlNTliYzM4OGI0IiwibmJmIjoxNjg3Mjk2NDMxLCJncmFudF90eXBlIjoiY2xpZW50X2NyZWRlbnRpYWxzIiwic2NvcGUiOlsianBtOnBheW1lbnRzOnNhbmRib3giXSwiYXV0aF90aW1lIjoxNjg3Mjk2NDMxLCJyZWFsbSI6Ii9hbHBoYSIsImV4cCI6MTY4NzMwMDAzMSwiaWF0IjoxNjg3Mjk2NDMxLCJleHBpcmVzX2luIjozNjAwLCJqdGkiOiIxcmFheE5lX0U5WEJjYXZCeWthWjNYbVhRQTQifQ.aa40_NouKMtMT1sNls00rswQlCnscCQz9CSkFE9tEqYnWH7f_o4EGC9XymTIhHseHHRMzJIwNbjqrbPbYuySEU_ePxHpICkWzD6xltQ2xMFAh1xHP48VcpnhySUAwx_gUm2_84iKg-19Y3lWUszF0VDESaOyBzvM6AQYelWG8iXdstIIz0WgmnsXFOu53ZBzuYgvYWO3zJ_dx-pY23Dh70e8-3ec5aO1JrkuunnP1_o7NXeEVzo1c-PllmVEFV2plqKQtyUx3JftVJmy0OOfzDYBFpoDoUmUSsfPH_8x6Ac6svqGeZ9djEo-EwcAg44kuYyTU69Hloz4Iv-wC2ubyw",
  "scope": "jpm:payments:sandbox",
  "token_type": "Bearer",
  "expires_in": 3599
}
If an error occurs, the response will include an error_description to provide more context:
{
  "error_description": "Client authentication failed",
  "error": "invalid_client"
}
Make your first request
Now that you have obtained an access token, you can make your first request. In the following example, you will learn how to call the Online Payments API to make a credit card payment and confirm a successful response.
Create and send a request
Make a POST request to the Online Payments API, passing your unique access token in the authorization header:
curl --request POST --url https://api-mock.payments.jpmorgan.com/api/v2/payments --header "Accept: application/json" --header "Content-Type: application/json" --header "Authorization: Bearer <your access token>" --header "merchant-id: 998482157630" --header "minorVersion: " --header "request-id: 10cc0270-7bed-11e9-a188-1763956dd7f6" --data "{ \"captureMethod\": \"NOW\", \"amount\": 1234, \"currency\": \"USD\", \"merchant\": { \"merchantSoftware\": { \"companyName\": \"Payment Company\", \"productName\": \"Application Name\", \"version\": \"1.235\" } , \"merchantCategoryCode\": \"4899\" }, \"paymentMethodType\": { \"card\": { \"accountNumber\": \"4012000033330026\", \"expiry\": { \"month\": 5, \"year\": 2027 } , \"isBillPayment\": true } }, \"initiatorType\": \"CARDHOLDER\", \"accountOnFile\": \"NOT_STORED\", \"isAmountFinal\": true }"Confirm response
A successful response will return your payment transaction details. Refer to Online Payments response codes for more information on supported response types.
{
  "transactionId": "9f186d77-cb1b-4a9f-bb44-b5be91b891ac",
  "requestId": "40902d7b-4566-485c-bd07-7aef69557f55",
  "transactionState": "CLOSED",
  "responseStatus": "SUCCESS",
  "responseCode": "APPROVED",
  "responseMessage": "Transaction approved by Issuer",
  "paymentMethodType": {
    "card": {
      "cardType": "VI",
      "cardTypeName": "VISA",
      "maskedAccountNumber": "411234XXXXXX4113"
    }
  },
  "captureMethod": "NOW",
  "captureTime": "2023-09-18T18:04:26.898Z",
  "initiatorType": "CARDHOLDER",
  "accountOnFile": "NOT_STORED",
  "isVoid": false,
  "transactionDate": "2023-09-18T18:04:26.898Z",
  "approvalCode": "tst021",
  "hostMessage": "Approved",
  "amount": 1000,
  "currency": "USD",
  "remainingRefundableAmount": 1000,
  "remainingAuthAmount": 0,
  "hostReferenceId": "xf1kGP1Q9zajkzcQ7SIpA6",
  "merchant": {
    "merchantId": "000020001234",
    "merchantSoftware": {
      "companyName": "Company Name",
      "productName": "Product Name"
    },
    "merchantCategoryCode": "4899"
  },
  "paymentRequest": {
    "paymentRequestId": "9f186d77-cb1b-4a9f-bb44-b5be91b891ac",
    "paymentRequestStatus": "CLOSED",
    "authorizations": [
      {
        "authorizationId": "9f186d77-cb1b-4a9f-bb44-b5be91b891ac",
        "amount": 1000,
        "transactionStatusCode": "CAPTURED",
        "authorizationType": "INITIAL"
      }
    ],
    "captures": [
      {
        "captureId": "9f186d77-cb1b-4a9f-bb44-b5be91b891ac",
        "amount": 1000,
        "transactionStatusCode": "CLOSED",
        "captureRemainingRefundableAmount": 1000
      }
    ]
  }
}
You successfully sent a credit card payment request to the Online Payments API. This is just the beginning of what our APIs can help you achieve.
Next steps
- Learn about the authentication steps needed to add security credentials to send requests to our APIs.
- Explore more capabilities of our products in Online Payments, Optimization & Protection, Global Payments, Embedded Payments, and more.
- Review our API specifications.
- Contact your J.P. Morgan Payments Representative to determine which product is right for your business goals.