Pay by Link
Pay by Link enables you to create a link to collect payments from your consumers. Pay by Link uses headless integration to initiate payments by sending a link via your preferred channel, eliminating the need for your consumer to visit your online store. When the consumer taps on the link, they will be redirected to your payment page (based on your Checkout settings and design) for them to complete their payment. Pay by Link can be used in tandem with Drop-in UI or Hosted Payment Page.
The payment link can be created and configured using:
- Commerce Center
- Checkout API
Before you begin
To create a payment link, you must first configure Checkout Settings. Settings like branding, payment information, etc. apply to Pay by Link. After the settings are published, you can create payment links.
Perform the following steps to configure Checkout Settings:
- Log in to Commerce Center.
- Go to Settings.
- Click Checkout from the drop-down list.
- Select configuration settings as per your business needs.
- When you are done, click Publish.
How it works
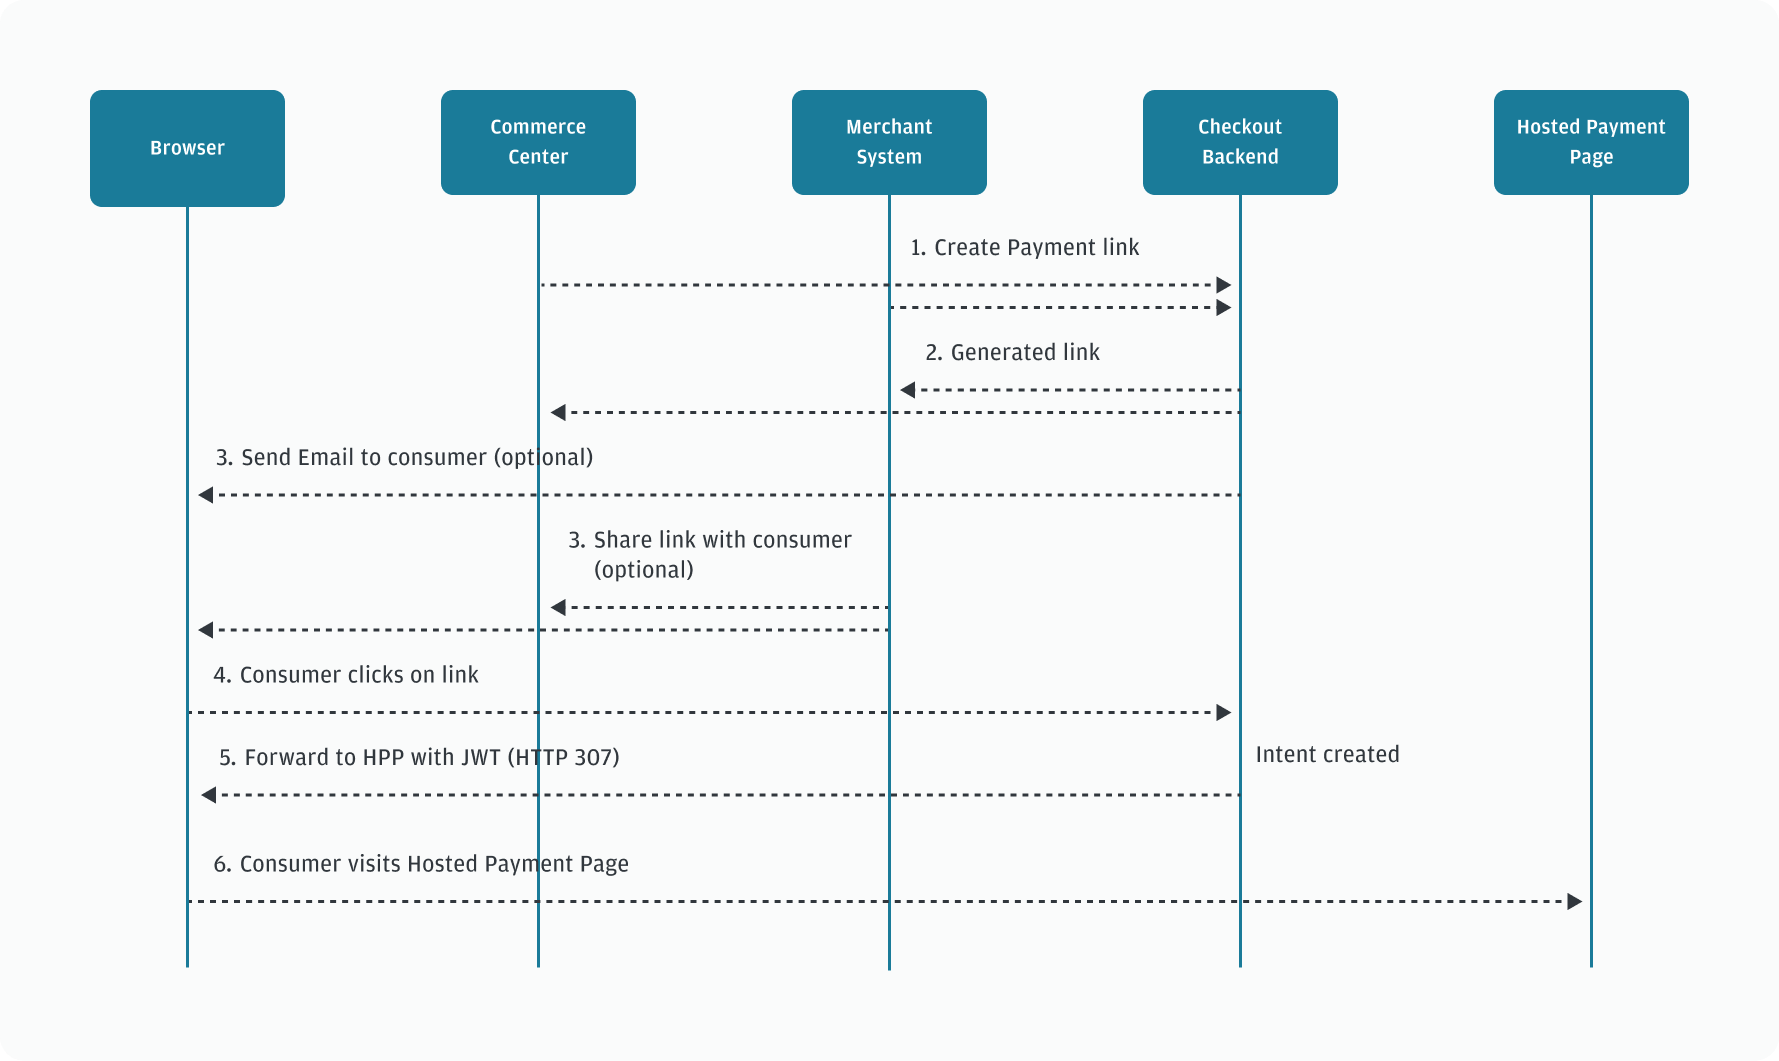
Here's a diagram that illustrates the Pay by Link process flow to help you better understand the flow of information between the components.

- You create a Payment Link using Commerce Center or Checkout API, which sends a request to Checkout back end.
- Checkout backend generates the payment link and returns it to your system and Commerce Center.
- The generated payment link can be sent via email or shared with your consumer. (optional)
- The consumer clicks on the payment link and Checkout backend creates the Checkout intent and checkoutRedirectUrl.
- The consumer is forwarded to our Hosted Payment Page (HTTP 307) using the
checkoutRedirectUrl. - The consumer visits the Hosted Payment Page where they complete the checkout flow and land on the success page.
Configure payment link with Commerce Center
Create a payment link in Commerce Center by performing the following steps:
- Go to Terminal and click on the Pay by Link menu item to access the Pay by Link dashboard.
- Select the Merchant ID under which you want to create the payment link.
- Click Create to start building your payment link.
- Enter the details for the following fields:
Required fields for creating a payment link in Commerce Center Field name Description Required (R) or Optional (O) Title The name or the title of the product or service R Description A short description of the product or service. O Price The total price of the product includes the tax, shipping, and any additional costs. There is a sub-field to choose the currency. R Order ID A unique identifier for the order (like order number, invoice number) can be entered. The order ID should be unique and should match the following criteria: - Must be 8-22 characters long and should be unique to all previously created order IDs.
- Valid characters include alphanumeric characters, - , $, @, and spaces.
O Expiration Date The date on which the link will expire. By default, it is set to 30 days from the date of creation. R - After all required fields are entered, click Create Link.
- If the notification preference to send emails to consumers is turned on, then an email will be sent out automatically.
Now your payment link is ready, and you will be redirected to the Link Summary page where you will find the:
- Link ID
- Link URL
- Order Information
- Expiration Date
- Option to copy the link
- Option to Email the link
- Option to deactivate the link
When you click on Email Link, a modal pops up where you can enter the email address of your consumer and click Send to send the payment link URL.
Pay by Link dashboard
The Pay by link dashboard has the following listed :
- URL with the copy option
- Link Status
- Price
- Order ID
- Created On
- Expiration Date
- Action
You can email or deactivate a payment link by clicking the ellipsis under the Action tab and selecting Email Link or Deactivate Link.
You can filter and sort the dashboard using the following:
Filter by:
- Link Status
- Price
- Order ID
Sort by:
- Created On
- Expiration Date
The dashboard gives you the option to export the data in the form of an Excel spreadsheet. If filters or sorting is used, the dashboard will get exported with the changes applied.
Configure payment link with Checkout API
Before you proceed with creating a payment link, ensure to first create a product.
Create and manage your payment links via the Checkout API using the following options:
- Create a payment link for a product
- Update a payment link
- Retrieve a payment link
- Retrieve all payment links created
To learn how to create, update and retrieve your payment links, refer to manage payment links.