Getting started with J.P. Morgan Payments - OAuth authentication
15 July 2024
Authentication is a complex but essential aspect of securely developing with APIs.
To make this easier, we created a repository of example code snippets in various languages to get you up and running quickly. You can check them out on J.P. Morgan Payments GitHub.
Why use J.P. Morgan’s code snippets?
- Instant Access: Dive straight into coding with our easy-to-use examples.
- Multi-Language Support: Whether you’re a Python pro, a JavaScript guru, a Java aficionado, or a Go enthusiast, we’ve got you covered!
- Postman Integration: Prefer to tinker with APIs without coding? No problem! We’ve included a slick Postman collection for seamless API exploration.
How to get started
In the example that follows, we will use the Python sample code to walk you through sending your first authenticated request to our Embedded Payments API.
Pre-requisites
- An account on the J.P. Morgan Payments Developer Portal; instructions are available here.
- Your favorite IDE setup
- Python 3+ installed
Let’s make an authenticated request!
1. Clone the authentication repository to get a local copy of the sample code using the command below:
git clone https://github.com/jpmorgan-payments/authentication You can reference our QuickStart Guide if you need help setting up your project, or locating the required parameter values in your project dashboard.
2. Open the authentication project using your favorite IDE and navigate to python/sample-authentication-code.
3. Create a .env file and populate it with your CLIENT_ID, CLIENT_SECRET and ACCESS_TOKEN_URL. These are all details required for gathering an OAuth access token, which you can find on your J.P. Morgan Payments Developer Portal.
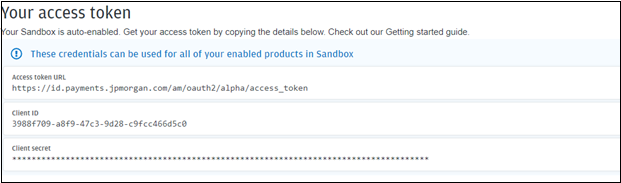
You can reference our QuickStart Guide if you need help setting up your first project, or locating the required parameter values in your project dashboard.
4. Open the main.py file under python/sample-authentication-code. This file includes a snippet showing how to request an OAuth access token and then using the token to send a request. In this example, we send a GET request to the list client's endpoint of the Embedded Payments API. You’ll notice the endpoint URL listed in the api_url variable; for us, this will be https://api-mock.payments.jpmorgan.com/tsapi/ef/v2/clients.
5. With all our properties set, it’s time to run the code! Open your command line and navigate to the python/sample-authentication-code directory within your cloned project.
6. Enter the below commands to install our dependencies and then to run the script:
pip install -r requirements.txt
python main.py
7. If successful, your output should include JSON code like this:
{
  "metadata": {
    "page": 0,
    "limit": 25,
    "total": 4
  },
  "clients": [
    {
      "id": "1000010400",
      "partyId": "2000000111",
      "products": [
        "EMBEDDED_PAYMENTS"
      ],
      "outstanding": {
        "attestationDocumentIds": [],
        "documentRequestIds": [],
        "partyIds": [],
        "partyRoles": [],
        "questionIds": []
      },
      "status": "APPROVED"
    },
   .........
  ]
}
Congratulations on successfully making your first authenticated request to one of our Payments APIs! This process can be replicated for accessing our other APIs and endpoints seamlessly.
Related
- Review all the available payments APIs at the J.P. Morgan Payments Developer Portal.
- Try out our other sample applications and code samples at https://github.com/jpmorgan-payments.
Happy coding!